Pages

Wednesday, November 27, 2013

Sponges ~~ Not just for barn work anymore!

The challenge over at Heart 2 Heart is to use a sponging technique!   I've never sponged a paper product before.  I'll admit to using an old washcloth, baby wipes, and the edge of an old barn T that I may be wearing, but I've not done any sponging on paper!

That means I had to go down to the kitchen/laundry room to see if I had any sponges I had not used to apply conditioner to reins, saddles, boots, etc.  I finally found a sponge under the sink in the kitchen that looked new......we'll say it's new...

I ventured back up to the craft room where I now needed to decide what to do with this sponge.  Hmmm.......  think...... think,,,,,, think some more.


Sitting over in the corner was lace we had used in a backdrop from Katie's wedding.  It was already torn into strips, so I decided to cut a piece from one of the strips, tape the corners down to a piece of Daisy White cardstock and sponge over it with Holiday Red.

Ok, this was sort of fun, but what next?  I thought about the Partridge and Pear paper I had left over from last year.  Ah, but now the white cardstock didn't work for me.  I took another piece of my sponge and sponged over the red with Chocolate and then distressed the edges.

The sentiment is from the CTMH Very Merry Christmas stamp set.  The Blush ribbon strip is CTMH Color Ready Seam Binding with Blush ink.  The bow is actually "vintage" CTMH ribbon.

The little berries with the partridge are really the cream Mocha Gems colored with Hollyhock pigment ink.  (Oh, my!  I just saw CTMH is retiring the Mocha Gems.  I don't know if I can make something without using one of those little gems!  Have I mentioned how I feel about those?  I have?  A million times?  I better stock up on those!)  The sparkle gem is also CTMH and it's from the Sparkles Brown and Tan.

So there it is, my "take" on sponging!  Now, the next time I need a sponge for house work, I won't have one.  Oh, darn!  Guess I'll just have to skip the house work and either work in the barn or come up to the craft table!  ; )


Happy Thanksgiving!

I'm sure at this point everyone has finished the "paper" preparations and have proceeded to the food and entertaining portions of Thanksgiving!  I'm sharing one last card for the occasion!

This card was put together with some scraps left over from other projects as a last minute card.  Everything was laying on the desk!

I started with CTMH Champagne cardstock as the base.  I then used a piece of Huntington paper and layered Barn Red over that.  The Poster Tidings fall sentiment is stamped in CTMH Sunflower (old name for the color, maybe that is comparable to Honey), Chocolate, Barn Red and New England Ivy.

The leaves are cut from the CTMH Artiste and Artbooking cartridges out of Autumn Terra Cotta, Honey, and Sweet Leaf cardstocks.  I inked the edges in Holiday Red and Chocolate.  I turned up the edges of leaves and adhered them with glue dots.

I embellished with a tiny scrap of gold tulle-like fabric that was laying on the desk and some embroidery floss.

Sending this over to Grateful Challenge at Heart 2 Heart.

Wishing everyone a happy and safe Thanksgiving coupled with a festive beginning to Advent!  Time for me to get out the blue cardstock & Frosted Paper quickly followed by the festive reds, greens and Sparkle and Shine Papers!


Saturday, November 23, 2013

Turkey in 3-D!


Turkey
for 
the 
hunt!


This is a great Thanksgiving for us!  We have had a wonderful year of additions to our family and we are oh, so thankful.  When Katie brought home her beau and announced a June wedding we couldn't have been more thrilled because with this wonderful young man came a beautiful 4-year old daughter.  This, of course, means I get to celebrate the upcoming holidays as Nana Katrina!  This put a whole new spin on everything!

So, I get to start some new holiday traditions for our family.  I've decided to do a turkey hunt for her.  I created this pretty 3-D turkey from the CTMH Artiste Cartridge.  I cut two turkey bodies and two turkey tails.  The cardstock is from DCWV Rustic.  I adhered them together and made the cut in the tail portion a little longer.  

I used CTMH Chocolate to ink around the cuts.  I used CTMH Adorable Background (retired) to stamp the body.  His little eye is a Mocha gem from CTMH; have I mentioned how much I love those mocha gems in past posts?  hahaha

So, this little fellow will be somewhere in Nana Katrina's house waiting for a special little girl to find him at Thanksgiving!  What will the prize be.......hmmmm.........

Before I hide him in the house he's going to make his way to the Bitten by the Bug 2 Turkey Challenge!

Friday, November 22, 2013

Always Grateful


I love the sentiment from this CTMH Stamp Set - Always Grateful.  It reminds me how I really do take so much for granted.  I truly am so thankful for the life I live with my wonderful husband, our farm and all the kids who surround me on a daily basis.

I cut the floral banner from CTMH Artbooking cartridge.  The little trumpeting pieces coming out of the banner are halves of the bows from the same cartridge.  The banner and sentiment card are also from Artbooking.  I embossed with a Flourish type folder from Cuttlebug for the Barn Red banner cut.

All of the paper is from the CTMH Huntington Paper Pack.

Check out the fun challenges at Color My Heart and Heart 2 Heart for inspiration, challenges and fun!

When you need more CTMH goodies, check out KatiesCorner!

Wednesday, November 20, 2013

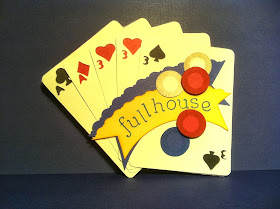
It's Gonna' be a Full House!

I'm so excited to make this card because it is a shower card for a couple who are adopting not 1, not 2, but 3 children!

It has been quite a change for my friends going from just the two of them to a full house!  They have been fostering the family for over a year and finally their dreams have come true!

When I saw the challenge at Heart 2 Heart to do a game inspired card, the idea of a poker hand - full house - came to mind.

I chose Aces over 3's to symbolize each of them being alone and joining to make a couple.  They met at a club and then he gave her a diamond!  The 3's represent the two beautiful girls and one cute little guy.

Ok, this is a bit involved, but I'll do my best to explain what I did.  I started in CCR and combined the 5 rectangles from CTMH Artiste Cartridge into a "card hand shape."  I copy/pasted that and then flipped it.  I joined the two and that made the card base!  I then separated the 5 cards and welded in the A's, 3's, hearts, diamonds, clubs, and spades.  I put scrap red and black under the cut outs.  They are all cut from the Artiste Cartridge, also.

The banner is cut from the Artiste cartridge.  Now here's the thing, it's not a banner; it's a cupcake wrapper!  I wanted something in the arch sort of shape and that is what I found.  So, I cut it and then made my changes.  The stamp set is Happy Alphabet CTMH.

The poker chips are cut from Artbooking.  To get the ridges around them, I masked the middle and stamped with the middle stamp of the CTMH My Sunshine set.  I would think with all the stamps in my drawers I would have had one to print ridges around circles, but I had to improvise!  It seems I'm never using my cuts or stamps for their intended use...........  Sitting here looking at the picture of the stamp set makes me want to do something with that cute little bird.  Hmmm.......

But I have digressed, as usual!

I used Ruby, Colonial White, and Black cardstock.  I'm not sure of the yellow color (might be Buttercup) and the blue was a scrap of textured cardstock.  My ink colors were Star Spangled Blue (old color, not sure what that would translate to now -- maybe Outdoor Denim?), Cranberry pigment, and Whisper pigment.

Check out KatiesCorner for the latest in Close To My Heart!  There are great tutorials as well as wonderful products!

Monday, November 18, 2013

"I" said the Donkey, shaggy and brown!

This Christmas card was made for my therapeutic horsemanship students.

I started with CTMH Champagne card base.  I'm not sure what the textured cardstock is because I had it all loose by color!  I smudged the tan rectangle with CTMH Topiary and New England green inks.  I stamped the letters with Fiskars Bold Alpha in New England green.

That sweet Donkey was cut from A Quilted Christmas cartridge.  The sentiment is from CTMH Very Merry Christmas.  The bow?  You guessed it --my bag of ribbon!


On the inside I printed the donkey verse from The Friendly Beasts.   I always loved that song as a child and still to this day envision the nativity with all the animals standing by quietly munching on hay!


Over at Fantabulous Cricut Challenge Blog is the Animal Cracker Challenge.  So, my shaggy brown donkey is trotting on over there!

Saturday, November 16, 2013

Smash Book Meets Artbooking Mini Albums: The Mini Series!


 Part 2:  Ribbon & Buttons

In my October 31st Post, I started this sort of Mini Album.  Those pages are going to end up being pages 10 & 11.  You can click on the date to see those pages.  Part 2 is showcasing pages 6 & 7 with an envelope tucked between them.  So, with no further intro here they are!

Page 6 is a cut from the CTMH Artbooking cartridge.  It is very lightly embellished with a border from the CTMH Florentine Paper.  
The envelope is cut from CTMH Champagne cardstock.  I used the Cuttlebug Paisley folder to emboss the flap and inked the edges with Chocolate CTMH ink.  The paper is again from the Florentine.  (I wish I had purchased more of that pack!  The papers really have a lacy, feminine country style about them.)  I used two buttons fromCTMH Mini-Medley Accents antiqued gold and blue embroidery floss as a closure.  

 The flip side of the envelope is cut from Florentine papers and I think I snuck a piece of Clementine in there - both retired from CTMH.  The button was in my stash, but I think it came with the scroll kit from CTMH.  The flower cuts are from the CTMH Art Philosophy cartridge.

Page 7 was cut from the Artbooking cartridge.  In CCR I made the page wider.  Then I folded it over the tope of page 7 on the hinged side.  I cut a piece of patterned paper and taped it down to the page.  To decorate the flap, I stamped a sentiment from the CTMH Love Life stamp set with Cocoa pigment ink onto more of the Florentine paper.  I taped this onto the flap.  Next, the ribbon was adhered to the flap folding the edges under the flap.  Finally, using an ATG gun, I taped down only the top and bottom flap edges creating a vertical sort of pocket for holding papers, tickets, or other goodies.  I tied a double bow to embellish the top of the ribbon and set the sentiment off with a gem from the CTMH Brown & Tan Sparkles Assortment.   

This week at Fantabulous Cricut Challenge Blog the challenge is Ribbons and Buttons.  I'm submitting late in the week and have seen the submissions; there are some very fun and creative cards, tags, and pages over there!

Check out KatiesCorner for all the incredible CTMH products and inspiration!  There are videos, tutorials, and ideas to spark your creativity!

Friday, November 15, 2013

Seeing Double White

Well the snow has already been flying in the midwest, so I guess it's time to winterize the horse trailer and think about winter activities!

The challenge over at Bitten by the Bug 2 is White on White and Heart 2 Heart is Seeing Double.  The winter weather and these challenges inspired me to think of ice skates -- white and there are two!

I started with CTMH Slate cardstock for the base.  I used a flurry type cuttlebug folder on CTMH Daisy White cardstock.  The skates are also cut from Daisy White; they were cut from the Winter Woodland cartridge.  I wanted to lace the skates with embroidery floss and silver thread; so, I cut off the laces on the cut.

They are hanging from a CTMH opaque silver gem.  I trimmed out the card with some white satin ribbon from the bag and a CTMH Floral Accent.

I am loving all the new accents from CTMH!  Check them out at KatiesCorner!

Tuesday, November 5, 2013

Life was Simpler in Black & White


When I saw the Black, White, and any shade of Green Challenge over at Color My Heart, I couldn't help but think of the old black and white TV's and the old sitcoms from my childhood.  I Love Lucy and The Dick VanDyke Show were a couple of my favorites.  Of course, I saw them years later in reruns as I'm sure most of you ladies did, also!

I remember the beautiful dresses and fashionable accessories the women would wear and all the polka dots.....and of course, PEARLS!  

Now, you might be thinking, "Sure, I remember, but where does the green come into play?"  Ah, I'm glad you asked! I remember when we would turn on or off the television, there would be this warm green glow.  I'm not sure if there truly was, or if I just remember it that way.

I suppose I'm feeling a bit nostalgic seeing as how I received my first AARP letter in the mail a couple of weeks ago!  Yee gads, couldn't they at least let me get through my birthday month?

I have digressed, as I often do, *sigh*....... back to the card!  The base was cut welding together Squares 1 and 2 from the CTMH Art Philosophy Cartridge.  My silhouette was cut from Sentimentals Cartridge.  I adhered the top layer to the middle layer and popped that off the first layer with 3-D tape.  I cut it lengthwise to accommodate the table and chair legs.  The pearls are CTMH Opaques Licorice and Pearl Adhesive gems; the paper is CTMH Daisy White, Black and Sweet Leaf.  I tied a double bow with ribbon from the 'bag o' ribbon'-- I really need to organize that someday.

Out to the barn now and then maybe I'll catch up in Mayberry over lunch with Andy, Opie and Aunt Bee!