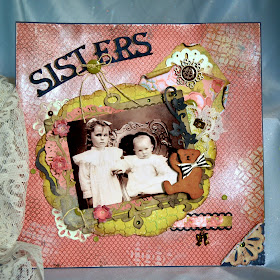
Where do I begin? This was one of those labor intensive projects, but worth every minute for me. I found this picture and was bound to do something with it. I scanned it into my photo program, doctored it a little, determined the size of picture I wanted and left it ready to print!
Next I went into Design Space and laid out the page choosing die cuts from these cartridges:
CTMH Art Philosophy
CTMH Artbooking
CTMH Artiste
Heritage
Home Decor
I cut all the die cuts from various papers and then cut the selected ones again from a cereal box. I inked all of the die cuts and adhered the selected ones to their "cereal box" backing. I do this just to give them a thicker dimension. It makes them a little more like chipboard.
I chose the Ariana Paper Collection from CTMH for the dies and background. I ran the mat through my embosser using the CTMH Quatrefoil Embossing Folder.
 The flowers were cut, manipulated, glued, and painted with Create a Shade Paint Pearl mixed with Blush re-inker. Little gems adorn the middle.
 The charms are from the Base and Bling Collection at CTMH. I put a little gem in the camera to make a lens. The old fashioned brooch is from the Brocade Assortment.
Teddy's bow is from the Ariana collection.
Special techniques used:
Paper distressing and rolling
 Misting with homemade glimmer mist
Stenciling with homemade stencil
3-D Flowers with paint
Layering
Close To My Heart Products:
Green Epoxy Bubbles
Ariana Papers and Assortment
Brocade Assortment
Charms Base and Bling
Olive buttons
Distressed Backgrounds Stamp Set
Create a Shade Pearl Paint
Mocha Gems
Miscellaneous Items from Stash:
Lace
Tulle
Twine
Homemade Texture Paste Recipe:
Combine 1/2 cup of powder, 2 Tbs white glue, and 1-2 Tbs white paint. Add water for a thinner texture.
Glimmer Mist Recipe:
Making a stencil:
Using a die cut machine, cut any stencil shape you like from acetate or acetate alternative. Once cut, it can be used with ink, paint, texture paint, modeling paste, etc! Simply apply your medium and wash when finished! I have found using one of the many overlay cuts from Artbooking is perfect for a stencil. If you go into CCR or DS and delete the outer border, you have more border on your stencil.
Ok, then! I think I covered everything! There were a lot of steps in this one, so I'm sure I forgot something. Thanks for dropping by and reading to the end! ; )
This is going over to Heart 2 Heart Inspired by a Book Challenge ~ A book you read as a child. What book? Little Women! This piece is also going to Try it on Tuesday: Use your stash. I used lots of old stash from CTMH; most of it not available anymore: olive buttons, brooch, Ariana paper, gems. I also had old lace! Southern Girls are challenging us to use texture!
Although the Ariana papers are retired, you can check out ScrappyHorses.ctmh.com for new beautiful paper collections!


WOW! This is amazingly beautiful!
ReplyDeleteOh my goodness!! This is so beautiful Katrina!!!! :)
ReplyDeleteWow, this is gorgeous. I love it! Thanks for playing along with Heart 2 Heart challenges!
ReplyDeleteKatrina, the detail you put into your layouts is always amazing! This is no exception. I love the misting and texture you use. You said in your post that you used a powder in the homemade texture paste. What kind of powder? Would love to give this a try. Thanks for joining us this week at H2H!
ReplyDeleteThanks, Gail! I used bath powder; the recipe is on Gabrielle Pollacco's web site. I think she said she like scented baby powder. hahaha
DeleteThis is such a lovely photo and you have displayed it so well.
ReplyDeleteThanks for sharing with us at TioT
Avril
very nice thanks for playing with Southern Girls Challenge
ReplyDeleteGorgeous layout! So much detail and beautiful photo! Thanks for joining us at Southern Girls Challenge, best of luck!!
ReplyDeleteAbsolutely gorgeous! Thank you for sharing your tips and techniques too :). Glad you joined us at H2H!
ReplyDelete