Friday, May 29, 2015

Father's Day!


Over at Cut It Up, we're celebrating fathers with tie die cuts ----not to be confused with tie dye cuts!  hahahaha  Of course, you could make a tie dye tie die cut!  Ok, let's get away from my bad puns on homonyms and homographs and get back to the matter at hand.

I found this card on Cricut Design Space; it is called Father's Day Card -- Sunday's Best.

This is one simple card to make and it's really quite versatile!  I'm actually planning to use this card for a masculine congratulations card and not a Father's Day card.  (My dad isn't really the suit and tie kind of guy anymore.)  I think this card would be perfect for groomsmen, graduates, new jobs, etc as well as Father's Day.

This is an ideal last minute card; all you need to do is cut it and line it.  I did add the black triangles over the folded edge to make the shirt collar points black.

I chose CTMH fundamentals cardstock;  I used the same on the inside but changed the color by rubbing some black archival ink over it.  The pattern resists and the effect is really fun!  My congratulations stamp is from CTMH The Happy Couple.

I hope you'll join us in our tie challenge celebrating fathers and other important men in our lives.  Remember to include a die cut tie on your project for the opportunity to win a prize form May Art Ribbons!  Check out Cut It Up for all the details!

Thanks for coming by today!

I'm sending this card off to the following challenge:

Mod Squad Challenge Blog:  Masculine

Wednesday, May 27, 2015

Graduation Thank You's


Just a quick post to share an idea I had for graduation thank you cards for my son to send out.  He graduated a couple of weeks ago from Purdue.  These are quick and easy and since Purdue's colors are Black and Gold it worked for the color challenge over at Color My Heart:  Black, White, and Gold/Flaxen.  
I started by taking a picture of his stole, cap & tassel, diploma and his pic.  I noticed there was a blank space in the bottom right hand corner.  This was a great place to use the Stamp of the Month Typed Note.  I'd like to say I planned that, but .......

I left a white border on the picture and backed it with a Flaxen diagonal. 

The inside is white with some black shimmer trim.  I told you they were quick!  


Thanks for stopping by today!  Back to work with my scrappy horses in the barn; they keep me busy this time of year!


Thursday, May 21, 2015

All About the Dress!


I first made this card as a thank you card designed for the lovely woman who was so helpful in finding just the right dress for my daughter's wedding!  (See pic at the end of post.)  She was married a couple of years ago, but when I saw the challenge at If You Give a Crafter a Cookie, I had to make it again with some variation!

My son's friend is getting married in a country style wedding in a barn.  I chose to use the bride's colors and went with a bit of a rustic motif for a wedding card.  This card style could be used as thank you's for bridesmaids or shower cards, also!

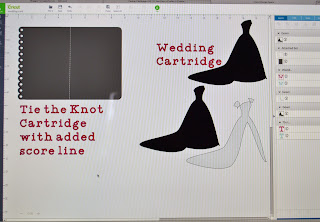
I'll attempt to describe my process in Design Space with the pictures below.  Please don't hesitate to ask if you have questions or something is unclear!


Papers:  CTMH Kraft and Lagoon Cardstock; White was a scrap piece; The Paper Studio Vellum; Kraft paper for envelope

Ink:  CTMH Chocolate

CTMH Stamp:  Make a Wish

Folder:  CTMH Flowers

Embellishments:  Bo Bunny Double Dot Jewels; Darice Twine; Scrap Lace; 3-D Tape


Finished Card and Envelope


Thanks for stopping by to check things out here at ScrappyHorses!  Feel free to browse around and look at other posts, make a comment, ask questions, etc!  

The first card I made from this idea.


My card is off to the following challenges:
Memas Challenge:  Anything Goes
The ABC Challenge:  J is for Jewels
Heart 2 Heart:  Extra, Extra Read All About It

Monday, May 18, 2015

A Little Different


This post is a little different than my usual posts; but it's ok to be different!  I usually describe my card or layout, but today I want to share a story.  So, grab a cup of coffee............

Today I'm feeling just a little bit proud.  Now I realize pride goeth before the fall, but I think I'm entitled to this!

Any mother would be proud to have her child graduate from a major university, but my situation is a little different----my son is a little different!

My little guy did not speak in sentences until he was almost 5; even then he had to be motivated!  We learned early on he had a serious passion for horses.  The first time he rode, he smiled until he had to get off the horse.  Then it was a nightmare!  That night at dinner he spoke one of his first sentences.  We started him in riding lessons and watched his language grow!

My husband and I were told he would not read or write when he was in 1st grade.  We got through that with intensive therapies and reading programs.  School was very difficult for him and soon he refused to go.  We had moved out to the country and acquired our own horses.  So, I used these resources and I homeschooled my guy.  He also worked with a very special riding instructor who  was a teacher who helped along the way.

Keith had always loved the 4-H program, so we thought we might be able to motivate him to slowly integrate into the school system using the FFA/Agriculture program.  Sure enough, it worked!  Counselors at the school still did not have high hopes for him and told me to start planning for what he might do after he aged out of HS.  After watching him win awards in 4-H Public Speaking and Demonstrations, I knew what my son could do.  I'd seen him train difficult horses, win ribbons and trophies, make tough decisions, and keep moving mountains.  He never gave up!

He graduated HS in 4 years with technical honors and was accepted at PU in 2011.  Last Friday, we attended his graduation from Purdue University School of Agriculture.  Today he started an internship with an agricultural company.

Yes, I'm just a little too proud, a lot happy, and very thankful for our friends who helped us along our journey!  You might be wondering if he is still a little different..........yep, he is.  But he has come a long way!  He is a volunteer firefighter, has friends, loves vehicles and horses, and makes his mom proud every moment!

He also inspired me to take what I have learned and teach therapeutic horsemanship.  Now we have 11 students in our program PATCH by Design.  When some of the parents come to me and tell me how their child is a little different, I simply smile and look forward to the ride!

This LO is off to the following challenges:

Path of Positivity:  Perseverance
Use Your Stuff:  Chevrons
Pile It On:  Not Cute
613 Avenue Create:  Anything Goes
Lasting Memories:  Determination

Thanks for coming by today to see my layout and read my story!  If you'd like to learn more about PATCH, press the word.


Friday, May 15, 2015

Misty About KEITH


We're getting a little Misty over at Cut It Up.  No, we're not sad; we're using sprays and mists on our projects!  What's more fun than getting messy and adding some shimmer to our lives!

Now, I do have to admit, I did get a little misty (as in sentimental) while working on this LO.  This is my son when he was a Sr in HS.  Tonight is his college graduation; his dad and I couldn't be prouder! Due to Keith's struggle with ASD, we were told he would never graduate HS; but those doctors/counselors didn't know us very well!  We jumped into a journey we never expected and we changed our lives  drastically, but it was all worth it.  Tonight we celebrate!

Ah, but I have digressed from the actual intent of this post..........Mists, sprays and die cuts.

Since a picture is worth 1,000 words, I'll explain my LO using pics.  A material list follows at the end.


I used Prima Color Bloom
Tea Stain to spray around
the right side of the pic.
I also put a few drops down the
bottom right side.
I 'mopped up' the excess spray with
the natural colored twine to darken
it so it would be more visible
in my LO.
Stencil is made from Acetate Alternative cut from the Artbooking Cartridge; I used Bo Bunny Bronze Spray over the stencil.

Close up of my die cuts cut on Cricut from the
Old West Cartridge


Material list
Papers:  Bo Bunny Anthem, CTMH Bamboo, CTMH Barn Red
Sprays:  Bo Bunny Bronze Glimmer Spray and Prima Color Bloom Mist Tea Stain
Embellishments:  Gold embossing powder, 2010 sticker,  Darice Hemp Cord #48
CTMH Retired: Gold buttons, gold studs, gold brads, mocha gems, color ready canvas letters, and burlap ribbon
Cricut Cartridges:  Old West
Inks:  CTMH Archival Black, black Sharpie pen, and silver gel pen
Stamps:  Retired CTMH Skylark Scrapbooking Workshop
Adhesives:  CTMH 3D Foam Tape, Aleene's Turbo Tacky Glue, ATG tape runner, CTMH Liquid Glass

We can't wait to see how you use your shimmers, sprays and mists!  Be sure to link up your projects at Cut It Up for a chance to win something special from Cute As A Button!

Monday, May 11, 2015

Inspire


It is such a happy day when a child discovers the fun of reading!  There is so much to learn, so many places to explore, and so much fun to be had!  Both of these girls love a good fairy tale with dragons, knights, kings, and of course a delightful princess!  My daughter loves to read to her little girl and inspire her to read on her own.

I started my background with gelatos and a baby wipe.  My script was done by adding Orange and Blush ink to some homemade texture paste.  The stencil is from Bo Bunny.  The heart and title were cut from Artbooking cartridge.  I wanted the title to have some shine, so I heat embossed it.

The CS's are from BoBunny and CTMH.  I embellished with the lined library card and sparkle flourishes from CTMH, Prima flowers, and BoBunny gems/pearls.  The jute was from my stash and colored with Prima Color Blooms Glistening Waves.

This LO is off to the following challenges:


Rochelle Spears May Tic Tac Toe:  Jute, Flower, Line Paper

Fantabulous Cricut Challenge:  Use a Cricut die cut and flowers


Stuck On U Sketches:  Die Cut Challenge:  Mothers:  This is a picture of my daughter and her very special girl.

Scrap Our Stash:  EMBOSS
     Embossed title
     Metallic gel pen
     Blooms by Prima, Book, Blue gems, Bo Bunny paper
     Old library card embellishment that is lined, Orange ink
     Sparkles Flourishes from CTMH
     Script Stickable Stencil, Shape of a heart

Thanks for coming by my blog today!  Feel free to browse other posts and leave a message if you like.

Thursday, May 7, 2015

Mothers!


Mothers are the ultimate "multi-taskers" with their busy lives!  They have to be to get everything done and still have a moment to breathe!

This card is sort of a visual statement of that fact!

I started with Colonial White.  The 2nd layer is a quilt made by weaving together 8 strips of paper from CTMH Hopscotch and CTMH Fundamentals.

Over that I made a fan of 4 pieces of CS with the top piece of the fan being a mom looking so stellar!

Laces, flowers, washi tape, a sequin, pearl and button embellish the card.  
Yeah, that's a mom's life, alright!  Lots of things to do, but in the end it's all tied up nicely in a bow looking all neat and pretty!

Uh,,,,,,sometimes!

This card is off to the following challenges:

Heart 2 Heart:  Mum's the Word
Just Us Girls:  Word Week - Twine
Pile It On:  Mother's Day or For a Lady
613 Avenue Create:  Anything Goes optional feminine

Happy Mother's Day!


Friday, May 1, 2015

Buttons, Books & Butterflies


Over at Cut It Up, we're all about those die cuts; but today we're about using those die cuts and adding cut paper piecing to your project!  Yes, you read that right....two kinds of cutting today!

This is my first project as a DT Member at Cut It Ups and I want to say I am delighted to be a part of the team!  These crafters are wonderful women and I have truly enjoyed meeting them through their projects and internet communication.  It is an honor to be included and share my projects with you!

This cute stamp is called
New Heights from
Gorjuss Urban Stamps.
I paper pieced this little girl by stamping her on a piece of white cardstock (CS).  Then I stamped her again on the yellow pattern paper (Brushed from CTMH) focusing on the dress of the stamp.  I didn't need to stamp any other parts of her or the books.

Then I used Copics and CTMH alcohol markers to color the image except for her dress and hair.  I fussy cut the dress from the pattern paper and attached the dress.  I colored the hair last since part of her hair is on the dress!

I've not done any paper piecing before, but I really enjoyed it!

My background paper is made from Colonial White CS.  I stamped the words, letters, and flourishes in Barn Red.  I laid out all the letters on the Fiskars Stamp Press.  That way I could duplicate it on each corner easily.  Next, I went over the entire piece with gesso I had tinted with Honey colored ink.  I put in machine stitches on the sides and distressed my edges.

I tore and rolled my edges on the top and bottom and added some ribbon, lace, and paper to add interest.

Most embellishments on this LO are from stash.  I can tell you the butterfly and flower sticker are from CTMH as well as the the stamp sets.  The gems on her dress are Bo Bunny Citrus Jewels.


Oh my, I almost forgot the die cut....it's the largest piece on the LO! The book was cut on the Cricut using the Cursive 101 cartridge.  The back is CTMH Fundamentals in Smoothie; the script paper is retired from CTMH Always.

We can't wait to see your take on paper piecing.  Come on over to Cut It Up to meet the new Design Team and check out all the beautiful projects.  Then you have until May 13 to link up your project for an opportunity to win a gift certificate from Pretty Paper Pretty Ribbons!

Thanks for coming by today!