Friday, February 28, 2014

It's All About ME!


This week's challenge over at Fantabulous Cricut Challenge is to use your favorite colors, but then it says All About You!  Well, I love that idea; so, I ran with it!

I have to say when it comes to horses my favorite colors are blue and brown.  When we show our sorrel horses, we usually wear blue/turquoise.

Now about the "It's All About Me" phrase, that is such a popular saying at my house!  All of us will say something and follow it up with a grin saying, "Well, it is all about me!"

Even my horse has that attitude!  Whenever we try to get pictures of my son, that horse has to be the center of attention.  He thinks he is Tom Cruise.  Now, on his behalf, that horse was bred for his looks.  He's an Impressive bred halter QH who has won many ribbons and trophies to just stand and look good!  In the top picture he was much younger, around 10.  In Keith's Sr Picture they are both 18.  For my son it's the beginning, but for Harry it is definitely middle-aged approaching his senior years.  Age hasn't changed this guy!  He still thinks he belongs in old westerns and when the camera comes out, he is on his mark.  He strikes a pose like none other.  In Keith's senior picture the idea was for Harry to lower his head and look at Keith, but as you can see that didn't happen.  Instead Keith was looking up at him, grumbling under his breath!  Harry is normally very compliant, but not when the camera is on him!

Ok, enough about my favorite red-headed guys!

I started by making my own background.  I'll make a list of the stamp sets below; I used a variety!  I then added the elements.  The cuts are all from Old West Cartridge.  The Font for the title is also from that cartridge, but the Cricut drew in the letters and I colored them in with a CTMH Twilight marker.   The barbed wire stencil was also made with that cartridge.


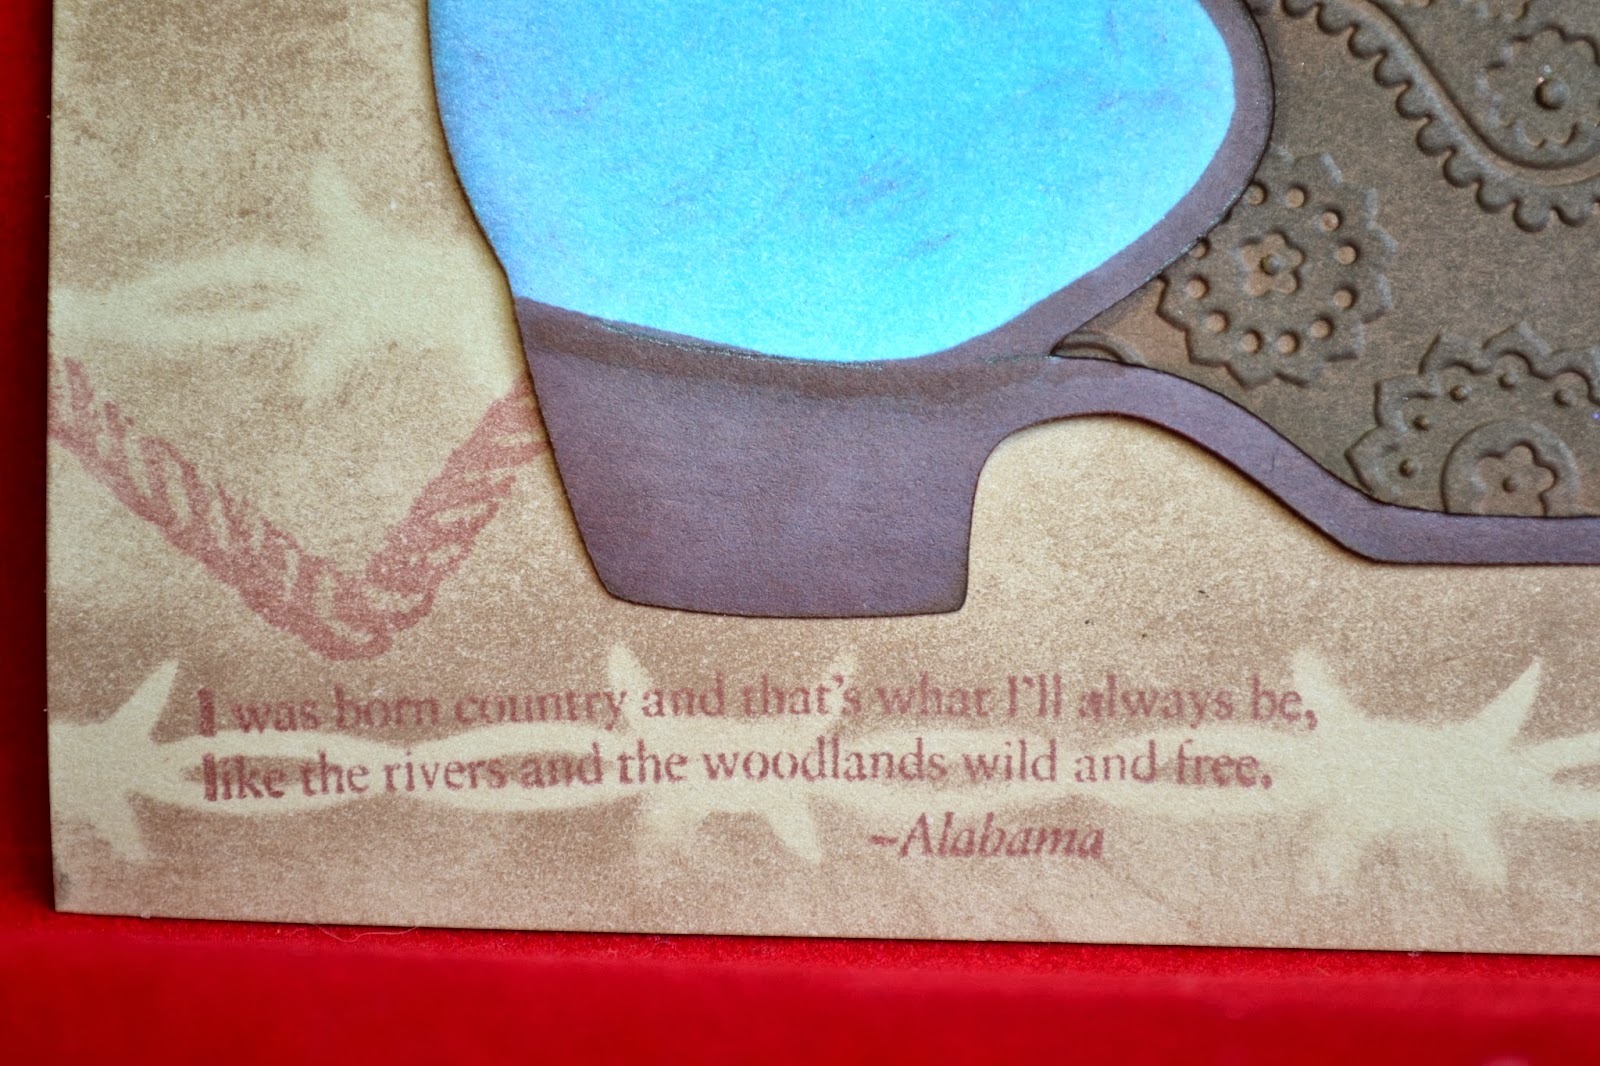
The rope was made from baling twine.  The boot was embossed with the paisley Cuttlebug folder.

List
Cardstock:  Sky Blue, Cashmere, Pacifica, Chocolate, Saddle

Inks:  Chocolate, Barn Red, Topiary
Pigment Inks:  Cocoa and Colonial White

Embellishments:  Cloud Nine Arrows (triangles), Pewter Badge Buttons, Mocha Gems, Brown Grosgrain ribbon from stash

Other stuff:  ATG adhesive, CTMH Twilight Marker, Black pen for journaling

Stamp sets are all CTMH:  Genuine Country, Yeehaw, Country Born, Horseshoes, Universal Backgrounds

Journaling:  "Whose picture is this anyway?  Do you have to steal the limelight every time?  Look at that old picture.  Eight years of photos w/you; can it be about someone else just once?  Please let my senior pic be about me!  You are not the star this time!  OK ~~ guess you are!"

All CTMH products from KatiesCorner!  Check out the new March Stamp of the Month!

Tuesday, February 25, 2014

I've NEVER done anything like this before! ; )


This is really "out of the box" for me!  I've never done a card or layout like this!  But the challenge over at Bitten by the Bug 2 is to use cricut cuts as stencils, so here we go.........

I started with white cardstock and then started randomly sponging ink around 'scrap cuts'!  I chose some discarded cricut cuts from my pile of papers.  You know, the left over pieces from when you cut hearts and scallops and clouds and such.  They make perfect templates/stencils!  Then after sponging in the flowers, scallops, and hearts I decided to get out the gel pen and color some of the shapes.  I filled in all the empty space with ink.

I used Archival Black and stamped the unicorn to look like a mystical shadow!  I used Lagoon Pigment ink for the Dream sentiment and added sparkle with the Teal Glitter tape in the corner.  I still have blue gems left over from the wedding ~~ I'll have those forever!~~ so I added those in the scallops.  I decided the stars around the horn needed some dots of glue and glitter.

The little hearts were left over from Valentines!

The card front is adhered to a Buttercup card base.  The card base was embossed with a Heart M-Bossability folder.

I have to say, this was FUN!  I'm giving this to one of my teen-aged girls who helps in my therapeutic horsemanship program.  She just had surgery on her hip and we're all praying for a speedy recovery for her!

Here's the supply list!  You can find all the CTMH (highlighted in yellow!) items at KatiesCorner!

Unicorn Dreams Stamp Set  Hostess Set: Contact Katie for Details!! 
Homemade stencils (heart and flower shapes) from Art Philosophy
Hearts ~ Ruby cardstock and Art Philosophy
Lagoon Pigment Ink
Archival Black Ink
Teal Glitter Tape
Dye Inks:  Gypsy, Cotton Candy, Lagoon, Sunset, & Blush 
Cardstock:  White Daisy & Buttercup
Liquid Glass:  used to adhere gems

Stash items:  blue gems, gel pens, and M-Bossability folder, glue, glitter, ATG gun

Monday, February 24, 2014

Cozy and Cuddly


There's nothing quite as cozy and cuddly as saying "yes" to the man and little girl of your dreams!  I'm sure my daughter never thought she would be saying 'yes' to two when the question was popped, but how much better could it be?!  That's why this is going over to Heart 2 Heart for the Cozy and Cuddly Layout Challenge.

They got engaged Christmas time 2012 and I'm just now getting around to getting it into a book!

I started with the picture of Katie and Lucy.  Lucy was all wrapped up in her daddy's Dr. Who Scarf!  Doesn't she look all cozy in that knitted scarf all cuddled up to Katie!  I chose the Partridge and Pear paper for the colors.  I could pull the red and green from the scarf with those papers.  I backed the large picture with Ruby and New England.

Then I decided to add the pictures from the proposal to this page.  I backed the first pic with New England Ivy that had been embossed with an M-Bossabilities Floral folder.  The "yes" picture was backed with Blush cardstock that had been stamped with the heart stamp from the CTMH Lovely stamp set.

 This large embellishment is a snowflake from the Art Philosophy Cartridge and distressed with New England Ivy ink.  The 2nd layer was cut from Sorbet cardstock and embossed with M-Bossability Heart folder.  When I adhered this piece, I only tacked down the center so the 'little flower' parts would stick off the page slightly.  This gave it a 3-D look without adding bulk.  The star-like center is from the middle of the 2nd layer of the snowflake design.  I placed the heart on top of that.  The heart is on Colonial White cardstock that was inked with blush and distressed with Ruby around the edges.  I used the CTMH Love Life stamp set for the sentiment on the heart.  The key is from the Brocade Assortment; these are in the "While Supplies Last," so get them quickly if you want them!


The journaling shape is from Artbooking and the stamp is CTMH Lovely.  I used the "Love" and "this holiday season" from the Scandinavian Wishes which was a stamp of the month from October 2013.  The little blush flourishes are from the Love Life stamp set.  I finished that out by embellishing with Flamingo Dots!

The embellishment at the top of the page was from my stash.  I took it apart and had those parts left over.  I wanted it to look sort of like a wish came true under a shooting star!

Looking for creative ideas, stamps and papers to scrap your favorite memories?  Check out KatiesCorner for Close To My Heart goodies!


Rock a Bye, Baby!


This is my Shabby Chick Cozy Quilt for a new baby.  I chose to make my own patterned paper using the following stamp sets:

Blush Color:  Remarkable Wreath CTMH
Sweet Leaf Color:  Cross Stitch Wishes CTMH
Buttercup Color:  A Tree CTMH
Sky Blue Color:  Love CTMH

None of these stamps is really meant to be used as backgrounds, but since you can bend them and they are clear it's easy to use them for that purpose!

I cut the quilt squares and stamped them.  I cut my heart from Art Philosophy and stamped stars from the Unicorn Dreams; the Love banner is from Remarkable Wreath.  I then grunged up the outsides following up with some distressing with Blush ink.  I made bows with embroidery floss and stitched them in as well as the line for the banner.

I glued all of the little squares onto a larger square, cut away the excess, and embossed it with a Cuttlebug bird and vine folder.  I'm not sure of the name of it!  I never keep the packages and never seem to have presence of mind to write it down.  I'm sure I could find it on the web, but as I'm searching it might make me lose track ...... and one knows, I can't be tempted to do that.  Once I'm looking at folders, then I start looking at other things and never seem to get back on task!  Wait, I'm doing it now with this long, tedious explanation of why I'm not looking up the name of that folder!  UGH!

Ok, back to the post!  Where was I?  Oh, yes, the embossing.  I then used that same folder to emboss the white background.  I adhered the Daisy White to the Sky Blue.  I wrapped Sky Blue Ribbon (CTMH retired) around the quilt on the left side.  I adhered the heart over it and put the little embellishment badge (CTMH Chantilly assortment) over the heart and ribbon.  I tied a little yellow bow (CTMH retired) and stuck it in the corner.  I adhered my quilt to the white cs.

Finally, I stuck on a few blue gems from the wedding left-over stash!  Geesh, those things will be around forever!  My card base is Sweet Leaf.

Now, here is the same quandary I pondered last week in this linked post, is this Shabby Chic?  I don't really know!  When I think of Shabby Chic, I think of old and shabby looking.  I see bows, ribbon, calligraphy, trunks; and all of that conjures up visions of the Victorian Era!  I don't why.  Now, when I think of that era, I think of birds and quilts.  I don't know why I think of that either, but I do!  So, here it is.

My little birdie is taking this quilt over to Curtain Call for the Cozy Quilt challenge and to Heart 2 Heart for the Shabby Chic Challenge!

Friday, February 21, 2014

Cards, Mocha Gems, and Ice Cream!


Topiary and Goldrush are the colors this week over at Color my Heart!  I had a great idea, sat down to create with the stamp set, and my mind started going in a different direction!  Isn't funny how the brain works when we create?  Truth is I started a card and kept seeing the floral background already embossed with an M-Bossabilities folder on a piece of goldrush cardstock.  I finally gave in, changed stamp sets and went with it!  I just couldn't fight it!

My sweet husband gave me this stamp set for my birthday back in October.  I stamped the Remarkable Wreath on Colonial White cardstock.  I stamped it 4 times with Topiary dye ink to make it full.  Then I pulled out Cocoa Pigment ink to stamp the flowers.  The sentiment is from the Remarkable Wreath stamp set and is stamped here in Archival Black.  The little gems are retired........sad face!  I love the Mocha Gems.  Have I ever mentioned that?  Oh, yes, a million times....I know.  I bought 3 or 4 packs when I saw they were going to retire!  But enough about my love of the gems and how I'll miss them when I eventually run out!  Oh, what a sad day that will be!  I must move on or I'll have to leave this post and go drown my sorrows in some ice cream!

Deep breath, check my stash and see there are still plenty of gems left!  Whew!  Ok, back to the card...

I took that embossed piece of goldrush cardstock that was nagging me and adhered the wreath to it.  I wrapped the Topiary Chevron ribbon over it and then adhered it to the Colonial White card base.  I tied a double bow and stuck it on and presto ~~ a sweet little card for any occasion!

All of these goodies....except the Mocha Gems..... sigh..... are available from KatiesCorner!  Check it out for videos, ideas, and a great selection of papers!

I might just need to get my guys and go to DQ!  Ice cream just might be in order!

Monday, February 17, 2014

Flourishes and an Interesting Sketch

Sketch from Fantabulous Cricut Challenge
Over at Fantabulous Cricut this week they have an interesting sketch as the challenge and Heart 2 Heart is showcasing flourishes.

So, I decided to combine the two for a "new to me" style of Shabby Chic.  This is not a style I dabble in very often, and maybe this card doesn't even qualify as Shabby Chic.  I'm not very well versed in all the different styles and what they entail....but, none-the-less, this is my attempt!


I started with the beautiful blue paper from the CTMH Balloon Ride paper pack.  Then I went into CCR and cut the mat using the opposite side of the blue paper.  I then used Sorbet cardstock and cut the long piece underneath the sentiment card.  This sorbet piece was made by "welding" fan shapes onto both ends of a long rectangle.  All of the shapes are from the Art Philosophy cartridge.

I embossed the Sorbet piece with a floral M-Bossabilites folder.

I stamped the sentiment onto the card with Juniper ink.  Notice the "Live" and "Laugh" are stamped in dark ink.  I went back in and stamped "Love" in 3rd generation stamping.  I stamped every other line upside down to fill in the blank spots.  Some of the ink was darker than others, but that's ok since I was going for a "shabby chic" look, right?

I then positioned my sentiment card on the blue paper and lightly adhered it with little tape balls.  I make them by rolling tape from a tape runner between my fingers.  It's enough to hold something in place, but not adhere it!  I then stamped the flourishes on the blue paper and sentiment card at the same time.  This flourish, as well as the sentiment, is from the CTMH Love Life stamp set.  I stamped the flourish with Chocolate pigment ink.

I cut some tulle and tied it off with fishing line.  (I love fishing line for crafting.  It's strong, clear and versatile!  Between fishing line and duct tape I feel like the MacGyver of crafting!  My daughter loved MacGyver.  When she was little she couldn't wait for that show!)  Ah, but I have yet again digressed in posting!

Back to the card...I then used Liquid Glass to glue the tulle to the sorbet shape and put it aside to dry.  I distressed the edges of the mat shape and the blue background.

Assembly was easy at this point.  I placed the sentiment card on top of mat on top of the blue paper to get the proper positioning to line up the flourish and adhered the mat down first.  Then I put the sorbet piece with the tulle on next.  I used 3-D foam tape to adhere the sentiment card on top of the tulle/sorbet piece being sure to line up the flourish.  I finished up by adhering this to the Colonial White card base and stamping "Love" on the inside.  I see this being an anniversary card or congratulations on engagement or even wedding.

To find all these beautiful CTMH papers and stamps, head on over to KatiesCorner!

Thursday, February 13, 2014

Color My Heart on Valentine's Day!


Highlighting a Windy Day!


Colors this week are Juniper, Blush and Sorbet!
This week I have the honor of being a Guest Designer at Color My Heart Challenge Blog!  I really enjoy Blog Challenges and I doubly love the challenges where I get to show off the Close To My Heart products!  Color My Heart is a fun challenge blog where the challenge revolves around  colors of the week and CTMH goodies.  For a full list of guidelines, come on over to Color My Heart.  Then create, link up, and play along!  The colors this week are Juniper, Blush, and Sorbet.  For me, these colors were screaming SPRING!

For this card I chose to highlight a few of the new products available from the Spring/Summer Idea Book.  The little cutie flying her kite, as well as all other stamping, is from the new stamp set Windy Day.  (This set also includes other sentiments and a little guy flying his kite!)  This sweet little one is colored with CTMH Blush markers.  The jacket is the darker of the two pens; the skirt is the light marker.  I used Whisper for the shoes.  The hair, skin, and bobbin for the kite string were colored with the Copic skin tone collection.  The cloud and girl were stamped with CTMH Archival Black ink.  The cloud was outline with the light Whisper marker.  The sentiment was stamped with Juniper, and the grass was lightly sponged with Juniper.

Another new item is the fun Dot Embossing Folder.  I find embossing can be a subtle way to add texture.  See top picture.
  
The kite (Sorbet color) and 'flags' on the kite tail were cut from Sorbet and Blush.  The border on the front of the card and more kite 'flags' were cut from whimsical Juniper Polka Dot from the Lollydoodle collection. The kite is part of the stamp set; however, the little 'flags' and the border on the front were cut from the CTMH Cartridge, Artbooking.  

Now, this is the year of "getting out of my box" and trying new to me techniques.  This card is no exception to that.  This is the first time I stitched on a card.  I used some pink embroidery floss for the kite string and tail.  I punched the holes using the tip of the piercing tool in the pattern I wanted to stitch.  I "free-handed" it, but CTMH does have a stitch guide to help make those precise!  I then stitched using skip and back stitches.  If you are unsure of this, CTMH actually has a video on how to do it!  Here it is:  Video.  Did you know there are many videos put out by CTMH?

Tip:  When stitching on cards, remember to plan ahead to cover the back so the stitching doesn't show!  I hid the stitching by folding back the right and left panels and then adhering them.

Finally, I embellished with a ribbon from my stash that matched the Sorbet color.

I liked this card; however, I wanted to remake it for a special birthday using more of the Juniper color because that is the recipient's favorite color!  So, here is the remake version -- very much a variation on a theme, but this time I left it open on the left hand panel to be a tri-fold of sorts.

Interested in finding out more about any of these great new products? Check out ScrappyHorses for the Spring/Summer Idea Book, videos, and great new promotions!

A huge thank you to everyone at Color My Heart for this fun opportunity to share my card with you this week!


My Valentine is one of a kind!


By now you all know about Katie and how she got married last June to a great guy and all of that.  You also have heard a little bit (haha) about the beautiful little girl that came in that package deal!  Anyway, this is the valentine I made for her.  I was going to use the new Unicorn stamp set, but then I saw this and came up with this idea.  In case you missed any of the posts with her picture, she has red hair.  So, I thought a red fox would be perfect for her valentine!

This card is all about theWild About Love stamp set.  Funny thing is, I didn't see myself using this set.  But I always take advantage of the stamp of the month from CTMH.  I opened the box, saw this little one and fell in love!  How cute is this little fox?

I started with Daisy White CS and stamped the fox background in Chocolate.  On another piece of white I stamped the main fox in Autumn Terra Cotta and Barn Red inks.  This gave me a really great color for the fox!  Then I went into CCR and cut the heart flowers and border from the Artbooking Cartridge.  I also cut some little hearts in various sizes.  Blush and Ruby were the color for cutting.

I used the CTMH Universal Backgrounds stamp to stamp the Saddle brown cardstock to come up with a sort of tree-like border with the hearts.  I stamped the hearts with little hearts from the Whooo's Your Valentine stamp set.  The flowering hearts are stamped in Ruby with a stamp from the Wild About Love set.  

This fox has picked a valentine flower and it has a tiny heart dipped in liquid glass in the middle of it.  That made a little jewel of sorts!  A few other hearts are scattered about.  The bow is made from the Color Ready Seam Binding.  


I wrote the sentiment using a Cri-Kits glitter pen.  The font is from Artbooking.  I made it extra large for a beginner reader!  :)  The inside of the card is cut from Art Philosophy.  I stamped the top border with the Whooo's Your Valentine stamp and colored in the open hearts with a gel pen.

What do you know?  One of those little foxes made his way into the card!  They are tricky little guys!

Wild About Love stamp set is available until the end of the month!  Check out Katiescorner for  all the great promotions from CTMH this month!

This little fox is taking her heart flower over to Hearts Galore Challenge at Heart 2 Heart,  the I Heart You Challenge at Fantabulous Cricut Challenge and the Valentine Challenge at Exploring Cricut.

Wednesday, February 12, 2014

Hearts + Horses/Unicorns = Happy Valentine's Day!


Ok, first off, what happens in the craft room and scrapping blogs MUST stay there!  If my son found out I did this with a picture of his prize winning show mini he would simply die!

These are pictures of Keith and Charlie at some shows from years past.  Keith is now a junior studying Ag Systems Management at Purdue.  Charlie is currently working in my therapy program here on the farm.  Keith is very proud of this little mini; they have taken everything from county fair Grand Champion to 4-H Horse of the Year to various champions at miniature horse shows.  I'm sure Keith would NOT think the picture above with Smoothie colored hooves and halter would be appropriate!


Ok, I have digressed early on with this post, so I'll try to get back on track and tell you about the card.

Hearts:  That's the theme over at Heart 2 Heart (Hearts Galore) and Fantabulous Cricut Challenge (I Heart You).   I was inspired to put hearts on the card, besides how can you have a Valentine without hearts?  ;)

First off, this card is going to some of my therapeutic riding students for Valentine's Day.

I started with a Daisy White background and stamped the stars from the CTMH Unicorn Dreams stamp set.  (This set is only available when hosting a gathering.  Of course, it can be on-line!)

The hearts and Charlie's frame were all cut from the Art Philosophy Cartridge out of Gypsy, Blush and Ruby cardstock.  The patterned paper is from the new Ariana paper pack.   The hearts were embossed using the M-bossabilities Heart folder.

Now, here is the fun part!  Since I'm trying new things, I decided to print the photo in black and white and then use my CTMH Smoothie marker and color in his hooves and halter!  He sort of reminds me of Dorothy from the Wizard of Oz!  Anyway, I can see this technique being used for other projects in the future with lighter colors.

The sentiment was stamped in Gypsy ink and is from the Unicorn stamp set.  I believe the yellow behind the sentiment is CTMH Buttercup.  I put a little Pink Glitter Gem bling in the corner of the picture.

Thanks for indulging my bragging on my boys!  There's only one thing worse than a mom with a child and that's a mom with a horse!

Check out Katiescorner to see the newest Idea Book and all the fun new stamps, papers and bling!


Friday, February 7, 2014

Whooo's Your Valentine?

I was the very lucky recipient of this really adorable stamp set!  I'm lovin' it!!

Katie, my daughter and reason for my CTMH obsession,  is really into the 'owl craze' right now; so this card is for her family.  I thought this would be a perfect card since it is their first Valentine's Day as a family!  Of course, my little grand girl will get her own Valentine from her new Nana; I have yet to get that one started.  I got a box from CTMH about an hour ago and the Unicorn stamp is in there along with Lollydoodle paper!  What would be better for a horse crazy 5-year old girl?  Nothing, right?

Reminder to self:  Focus.......stay on task!  Finish this, unload the dishwasher, and then you can open the box!

Alright, I'm back and concentrating on this precious little owl family!

Most everything on this card is CTMH and from the "Whooo's Your Valentine" stamp set.  The branch was cut from the CTMH Art Philosophy cartridge out of Saddle CS.  Ink colors are Sunset, Cotton Candy, and Ruby which just happen to be the colors over at Color My Heart Color Dare!

I started by sponging the bottom 3rd with sunset getting lighter as I went up.  I then sponged in the Cotton Candy and ended at the top with Ruby.  I used the stamp set on the bottom using Sunset alternating the stamp to put the open heart at different places.  I then colored in the hearts with a glitter gel pen.  I stamped the owls in Ruby and Cotton Candy.  I then stamped the heart/moon and the Love with Sunset.

I stamped with Cotton Candy over the branch with the xo circle in the set to give it texture and then glued it in place.  Finally, the little owlet!  I stamped her on White Daisy CS and cut her out.  She is popped off with 3-D Foam Tape -- ready to fly when Mom isn't looking!

Ok, off to unload the dishwasher and open my box of CTMH goodies!  Yay!  I have to say, this new Idea Book is full of the best papers yet!  For the first time, I wanted them ALL!  The hostess stamp sets are amazingly cute!  Stop by KatiesCorner.  Once you're there, go to 'Promotions' and click the 'Rediscover CTMH'.  There you will find some free Valentines to print!  Under that you'll see the link to the Idea Book.  Enjoy!


Wednesday, February 5, 2014

Coffee and Cloud 9


I love ordering the scrapbooking and card making kits from CTMH because you get the papers, a stamp set, and some extra goodies all for one price!  Now, I must admit I seldom make what is pictured in the instructions.  They are beautiful projects, and I would love receiving a card like any of them.  I suppose I have the mentality of a 2-year old saying, "I can do it myself!"  Or maybe I feel a little like I'm stealing someone else's work.  Or possibly I just don't feel like I made it.  Or............  Ok, enough psychoanalysis for today.  The point is, I used the kit and didn't make the cards they show!  But I promise I will use all the goodies in there on one thing or another!  : )

Now, on to the card...

This card was made with the paper from the Cloud 9 Kit with the addition of a piece of Daisy White for the sentiment and the inside of the card.  I also added some Teal Shimmer Tape and White Opaque Gems.

The card base is cut from Joys of the Season Cricut Cartridge.  The white you see behind the cup is actually the inside of the card.  The cup is in a window.  I cut the cup out of Honey card stock and glued it over the Lagoon cup that was welded into the card.  I stamped the cup with the chevron stamp from CTMH "Whooo's Your Valentine?"  I used Honey ink.

I then cut a cloud in Lagoon from Artiste a little bigger than the suggested size for the stamp.  This created the background for the sentiment cloud.  The scalloped frame is cut from CTMH Art Philosophy.

I was inspired to get my Cloud 9 Kit out of the package for the Color My Heart Challenge!


Hearts, Love, and Mittens?

When I think of hearts, love and Valentine's Day I always think of mittens.  I suppose it brings back memories of growing up in the midwest and my favorite guy and I holding hands walking in the snow.  We would be going to High School Pep Band or solo contest or some other musical event and we would both have on our mittens to keep our hands warm so we could play our instruments!  Ah, yes, that was a while ago ----32 years.  But wait.  We still hold hands and wear mittens, I still have to keep my hands warm to play gigs, and best of all... it's the same guy!  Wow, funny how so many things change and yet they're still the same!  

Ok, I started this with digression so I'll move on to the card!  My card base is CTMH Desert Sand and the background is from CTMH Pear & Partridge (retired).  I believe the colors of the mittens are CTMH Hollyhock and Smoothie.  I used Ruby ink with a chevron stamp and Blush ink with the heart stamp. Both stamps are from the CTMH "Whooo's Your Valentine?"  The mittens were cut from CTMH Artiste and popped off with 3-D foam tape.   The Smoothie heart was embossed with the Heart M-Bossabilities folder.  The tops of the mittens are embossed with a Cuttlebug Swirls folder.  

The sign post was cut from Smoothie cardstock welding 2 banners from the CTMH Art Philosophy Cartridge.  I then wrapped it in the CTMH Washi Tape from the Cloud Nine Kit.  The hearts were cut from Artiste in Smoothie and Colonial White.  The sentiment was printed from Artbooking with Cri-Kits; I'm really enjoying working with those!  I then colored in the letters with a gel pen and popped the white heart off the card.  

I embellished with some scrap pearls, CTMH Pink Glitter Gems and a pink ribbon.  

The inside of the card is paper with Blush ink smudged on it.  I then used a leftover from where I had cut some hearts to smudge the hearts in the corners.  The border was made with the chevron stamp on Smoothie cardstock.  The stamp in the middle is from the Cloud Nine stamp set.  

This card is making its way over to the following challenge blogs:

Heart 2 Heart   Hearts
Fantabulous Cricut Challenge   Red/Pink/White

Check out KatiesCorner for great CTMH products.  The new Idea Book is out and it's great!  The papers are versatile and beautiful.  The hostess stamp sets are the best I've ever seen!  Contact Katie to find out how you can get your hands on them.  On-line parties are a great way to have a party and get those incredible hostess rewards!  I just  had one and can't wait for my unicorn stamp set (one of the hostess sets).  You'll be seeing that one the minute I get it!  


Tuesday, February 4, 2014

Variations on a Theme


These three cards are basically the same, but I wanted to try some different techniques in stamping and 'coloring' them.

I started by stamping my CTMH Colonial White using a CTMH Thanks a Bunch stamp.  The first example was stamped using CTMH Pigment inks on the stamp.  I applied different colors to the stamp being careful to stay where I wanted to be - not an easy task for me!  I then colored in the flowers with the same inks as the 2nd and 3rd cards.

I sponged the sky blue and the grass green.

My second card was all stamped in Sweet Leaf.  I then went over it with CTMH markers and pigment markers.  The pink, purple, yellow, and red are pigment.  I added a tulle bow to this one and trimmed the blue card with pinking shears.  The sentiment was stamped using CTMH Dutch Blue Pigment ink for the first 2 examples.


My third one was stamped in Sweet Leaf.  I left most of the stems alone and colored in the flowers and hearts with the same pens as the other examples.  The sentiment was stamped using purple pigment ink from CTMH.  I then punched it up a little with some glitter.

The printed cardstock is from DCWV Blossoms and Butterflies.

This card will be flowering with its simple sentiment over at the Simple Salutations Challenge at Mark's Finest Papers MFPSpeedy TV.