Thursday, November 13, 2014

Fall Tidings


This is a simple card using scraps from CTMH Jubilee.

I started by importing a scan of my wreath stamp into Cricut Design Space.  I then "erased" a center and around the edges leaving room to include leaves, berries, or flowers that could be stamped over the actual wreath from the Remarkable Wreath stamp.  Once I had the cut the way I wanted it, I saved it and cut it from Colonial White CS.  The pumpkin is from Damask Decor.

Once I got the cuts, the card was easy.  The wood looking paper was pulled from my stash - not sure of the maker on that.  I simply adhered the papers, distressed some edges, stamped, inked and tied a bow!  It really was that easy!

Ok, there were a couple of other steps!  I cut a square of drywall mesh and stuck on some Mocha Gems and CTMH Bronze Glimmer Tape!

This is off to Bitten by the Bug where the challenge is to use a pumpkin.

All CTMH is from KatiesCorner.

Tuesday, November 11, 2014

Hopes and Dreams


My little grand-girl is at the hospital today to have here eardrum repaired.  Obviously, Nana needed a card for her.  The colors at Color My Heart seemed very cheery, so I went with those!
 I used the CTMH markers in Smoothie, Olive, and Honey to make my plaid background.  I alternated thick and thin lines and the light and dark colors.  Then I used Daisy White Pigment Ink to stamp the unicorn from Unicorn Dreams.  The unicorn is heat embossed with silver powder.

I added some sparkles to the stars around her horn!  She is backed with Smoothie Fundamental CS and a piece of Honey CS.  It's all tied up with some Baker's Twine.


Here's the inside!  The top border is a piece cut from the front.  The sentiment is from Unicorn Dreams as well as the little unicorn.


I'm hoping she feels better very soon!


All CTMH is from KatiesCorner.


Thursday, November 6, 2014

No B&T!


 No B&T (patterned) papers were harmed in the making of this layout!  Everyday in craft rooms across our globe, beautiful patterned papers are cut, stamped, crumpled, torn, pierced, and/or glued all for our artistic pleasure.  But today, my friends, not one patterned paper was touched!  No, they are all safe in their packages and drawers to see yet another day of peace.

If you feel these lovely papers need to be saved for another day, you need to check out Heart 2 Heart's No B&T Paper Challenge.

Now, I don't know about you, but when I'm told I can't do something, I just want to do it all the more!  I kept reaching for patterned pieces the entire time I was creating this LO.  I resisted the temptation and found other ways to add dimension and interest.

First I started with Colonial White CS and created my own patterned piece.  I used stamps from Sweet & Lovely and Pick a Posey.  * Sidenote:  Anyone else note the spelling on that Stamp Set?  Anyway, back to the paper.  I stamped with Cashmere, Champagne, Flaxen and Colonial White.  

Next I went into Cricut DS and used the ornament background from Artbooking.  I cut that out of Colonial White, also.  I painted over it with white gesso mixed with Blush re-inker.  

 Ornament cuts are from ArtbookingArt Philosophy, and Celebrate with Flourish.  They are embellished with CTMH gems.  Glitter and heat embossing were also used to decorate these ornaments.

I used the CTMH Quatrefoil embossing folder as well as a Cuttlebug Swirls folder on the Pear and Ruby card stocks.  CTMH Blue Epoxy Bubbles adorn the lace from my stash.  The raffia ribbon was also laying about!

You have all month to play at Heart 2 Heart.  Please save your B&T for another day and join the challenge!

All CTMH is from KatiesCorner.

Monday, November 3, 2014

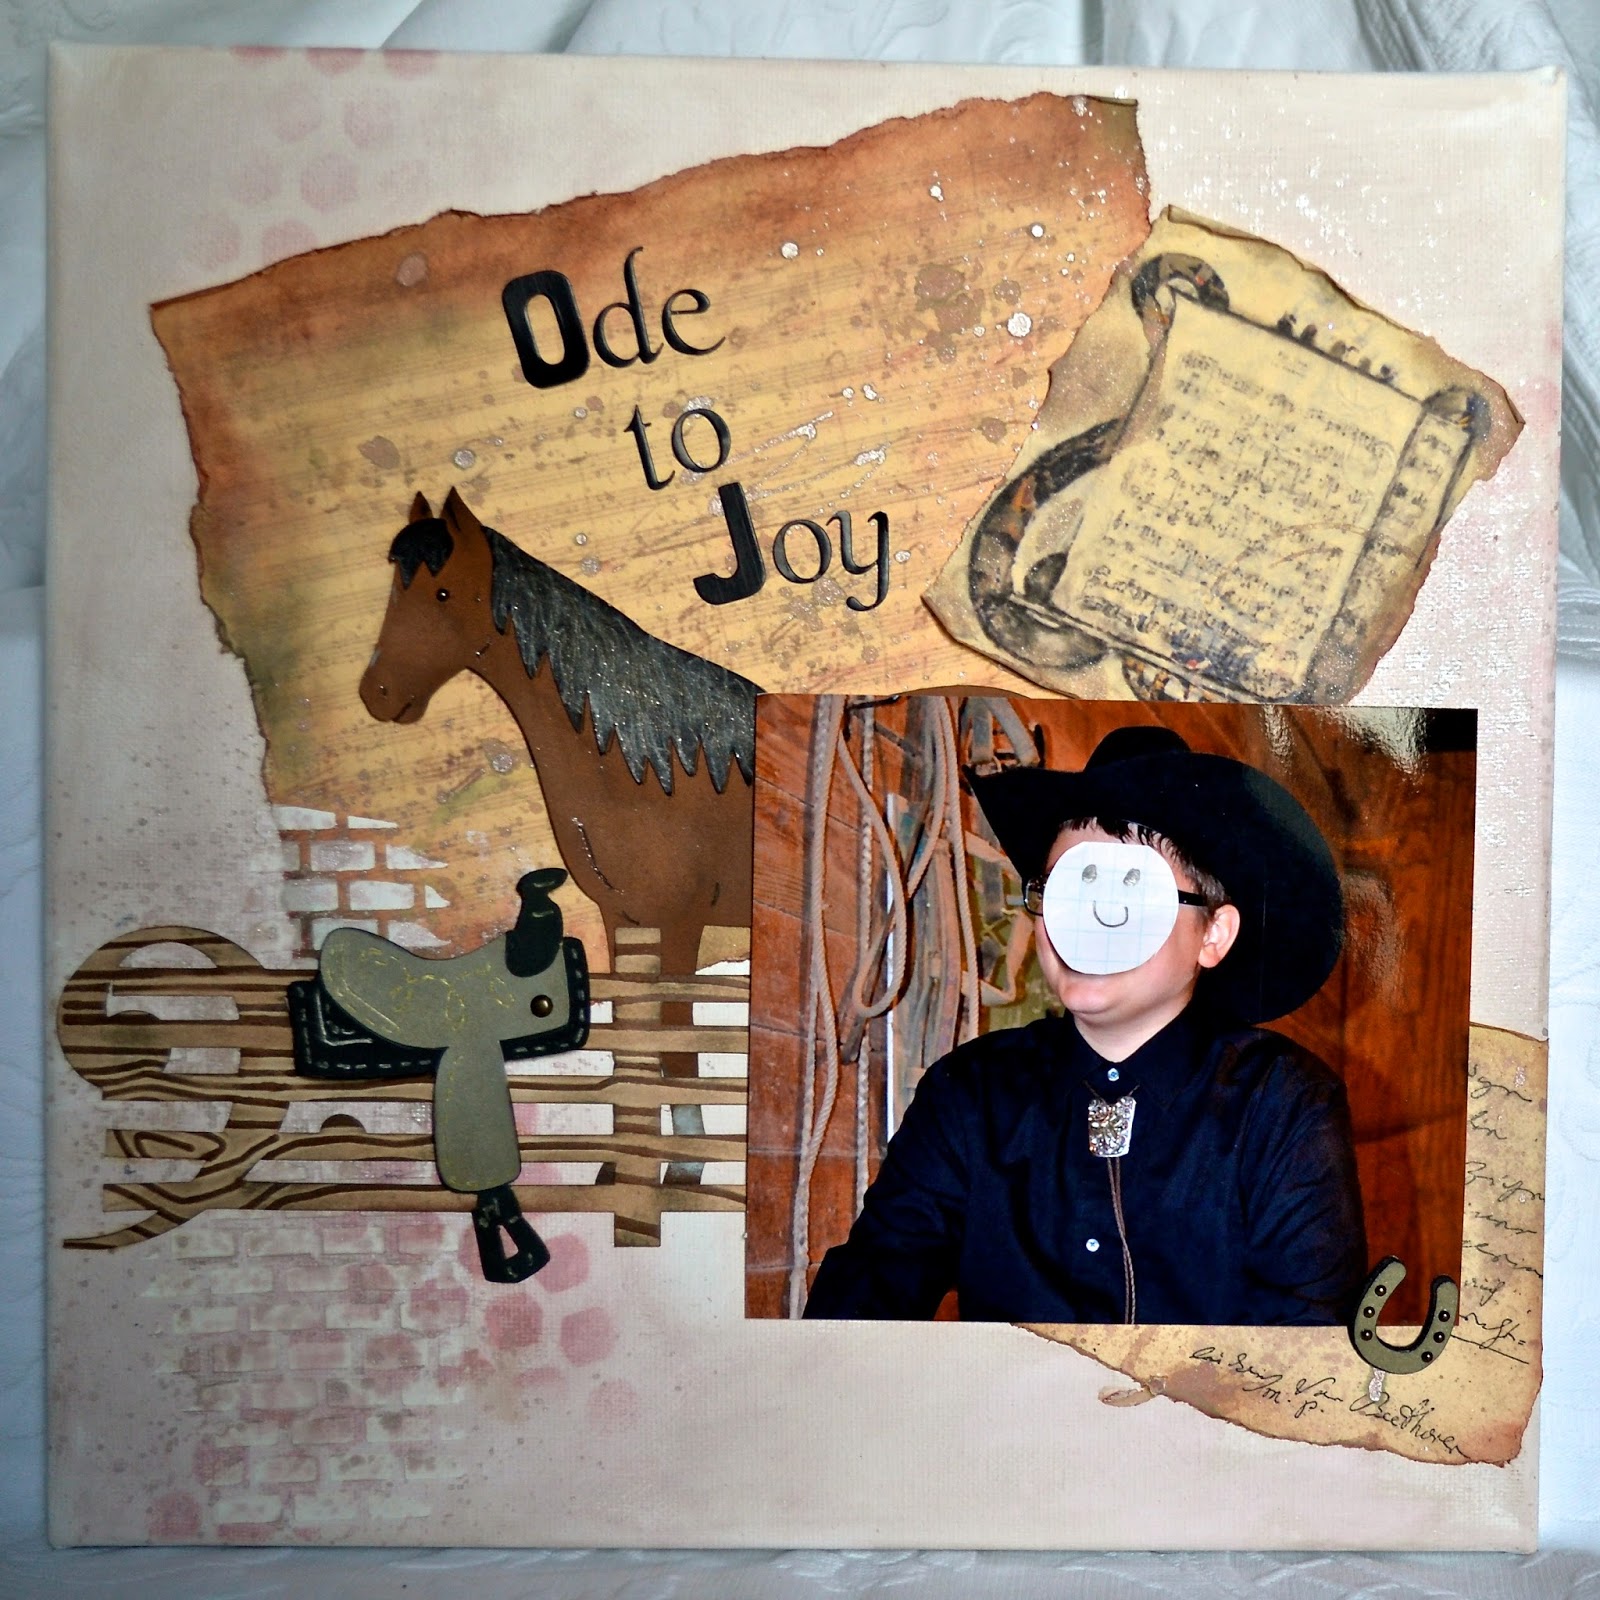
Ode to Joy


I was so inspired by the musical freestyle my PATCH students were practicing, I've made them all canvases to commemorate and thank them for sharing their performances.  This particular one is for a young man who chose "Ode to Joy" and "Fur Elise" by Beethoven.  Great choices of music, but a little difficult to put together with a miniature horse running around the arena doing his chosen maneuvers!  We finally found a piece by a blue grass band that worked perfectly for the occasion!
 
Prince, fuzzy and ready for winter,
and his leader at the show!
Now, if you're thoroughly confused at this point, that's understandable.  Let me explain, PATCH is a therapeutic horsemanship program geared towards kids with life challenges of all types.  We just had a show where they competed in different classes.  It was great fun!  Now, you're caught up and we can return to the regularly scheduled blog post!  ; )

I started by going to the internet and pulling some pics of Beethoven's music.  Being an oboist, I don't have much Beethoven in my personal repertoire!  The large sheet is "Ode to Joy"; the music on the stand is "Fur Elise."  Then I found a letter signed by Beethoven.  I made copies, distressed, inked, and sprayed these papers.

 I had an idea the cuts I wanted from Cricut Design Space.  My horse, shoe and saddle are from Old West.

Now, the fence was a bit of a challenge.  I knew I wanted a 5 board fence to replicate a staff.  My student plays trombone, so I chose a bass clef for the first fence post.  I basically just imported a rectangle and copied it 5 times.  I changed the size to make my post and the boards.  Then I welded them together.  I then added the bass clef and welded it.  For some reason I had trouble getting it to work; but somehow it finally did.  I'm not really sure what we did to get it to work.  My son-in-law saw my frustration and jumped in to help.  He's not sure what he did either!  hahaha

I ran the fence through the CTMH Woodgrain Embossing Folder and inked over it with chocolate.

I made stencils from Acetate Alternative for my dots and bricks.  The bricks were cut from the CTMH Artbooking cartridge and the dots are from the new CTMH Artfully Sent; although, dots are also in Artbooking.  The bricks were put in with homemade texture paste.

Before adding my elements, I sprayed with homemade glimmer mist:  water, CTMH Chocolate re-inker and CTMH Create a Shade Paint (retired).

All CS is from CTMH.  CTMH inks include:  Barn Red, Chocolate, Slate, Archival Black.

CTMH embellishments include:  Mocha Gems (retired), Antiqued Gold Mini-Medley brad (retired).

All CTMH products are from KatiesCorner.

My Classical Cowboy is going off to these challenges:

Scrap and Play
THANKFUL
T Tone on tone stenciling and ink, texture paste
H Horseshoe, homemade shimmer mist
A Acetate Alternative
N No Stamping on this!
K Katrina original design (bass clef fence)
F Filly (the horse is a filly)
U Uppercase letters in Title
L Letter from Beethoven (Copy-not an original - hahaha)

Fantabulous Cricut Challenge - Anything Goes
Heart 2 Heart - No Stamping!
Take Heart Ideas - Anything Goes with CTMH products
613 Avenue Create - Anything Goes: optional twist is holiday thankful/hostess gift

Friday, October 31, 2014

Orange!


Choose your orange!  Yep, that's the color dare at Color My Heart and I was so quick on this one, you still have all week to play!  So, jump on over there -- after you read my blog, of course -- and check it out!

I started with Kraft CS and braided the card edge.  Ok, I didn't really braid it!  It's much easier than that.  You can find directions for this technique on Youtube.  The template is found here.  I saw the idea for this at Such a Pretty Mess; to see her card go here!

Ok, now that you have seen how easy this is, I'm sure you'll want to try it.  I have an idea to change the size and use it in other ways.  More on that after some experimentation!

Oranges:  I chose Autumn Terracotta, Sunset, and Goldrush for my fall card.  I embellished with Mocha Gems, Burlap Ribbon scraps, and Baker's Twine.  There's a little piece of Bronze Shimmer Tape behind the backing peeking out.  I backed the sentiment with Scaredy Cat stamped with Family is Forever and What a Hoot.  The sentiment is from Poster Tidings.

All CTMH is from KatiesCorner.

Thursday, October 30, 2014

Colorful Birthday!


Heart 2 Heart had a color challenge to throw our way this month!  The colors included:  Desert Sand, Cranberry, Lagoon, and Goldrush.

I struggled with what I wanted to do with this challenge.  Then I got in a time crunch to get a card ready and this is what came of it!  Sometimes time restraints can make decisions for me and that is what happened here.

I looked at the stamp from Pick a Posy and started stamping a background in the 4 colors.  I backed it with Cranberry.  The sentiment is from Joyful Birthday.  I added a few of the dark Aqua Dots and Lagoon Baker's Twine and a card is born!

I hadn't used that stamp set, but I think I like this stamp as a background!  I'll probably return to this for another piece!

All CTMH from KatiesCorner.

Speaking of time crunches……off to work!  Thanks for stopping by my blog!


Wednesday, October 29, 2014

Happy Birthday Halloween Girl!


I have a student who celebrates a Halloween birthday.  This little cutie witch is going to be perfect for her!

I was inspired by several challenges for this one.

Heart 2 Heart  - Midnight challenge
Color My Heart - Thistle and Sunset
Fantabulous Cricut - Halloween
Retrosketches - Sketch

I turned to the CTMH Scaredy Cat papers for this one; have I mentioned how much I love those papers?  Those papers with the "Halloween Greetings" stamp set is a 'spooktacular' match!  The little witch is stamped, heat embossed and colored with markers.

Now I have to say I hate fussy cutting, so I scanned in the images from the stamp sheet and imported them into my Cricut Design Space!  Then the Cricut cut it for me and I stamped the cuts!  The little curlycues on the watch didn't work well for me, so I cut those off.  There were some areas that didn't ink due to my being off a bit, but it was easy enough to just black them out with ink.  I love the new cut features on the Cricut!

The pocket watch is from "Key Moments" stamp set.  Something about the midnight hour and the look on the little witch's face tells something is up!  I added a few little gems, sequins, and ribbon from my stash and the card is complete.

All CTMH is from KatiesCorner.

Tuesday, October 28, 2014

Hey! Those are my boots!


Ok, I'm playing catch up today!  I love to participate in the Heart 2 Heart challenges, but this past month has been a busy one getting ready for the PPFC this past Saturday at my barn.  You'll be hearing more about it in the next few days as I scrap pics and share some of the fun and frivolity!

Ah, but I have digressed from this post.........uh, back to playing catch up........oh, yes...the very first challenge this month in scrapbooking was "Show us your selfies!"  Yee gads, I hate selfies!  I know they're all the trend, but I truly can't, and don't, take pictures of myself!  I went to my photo program to see if I had any.........no, none there.  I went to my phone, no......wait!  Those are my boots taken with my phone!  I must have taken those pics!  Yes, I remember; it was during the spring flood of 2011 just weeks before Keith's graduation party!  

UGH, it was terrible out here!  Horses were in for weeks and we were digging trenches to get the water to drain from our property.  I'll not soon forget waking up to geese swimming in our pasture and the water just inches from the house!  I remember walking out further and further wondering how far I could venture before the water would be over my rain boots.  

So, here it is; my selfie!  I know, this isn't what you had in mind, but there's a great story here and I lived it making it worthy of note in My Crush Book!  ; )

Here are a few of the CTMH details:

Lollydoodle papers
Hollyhock Zipper Lace
Color Ready Canvas Alphabet
Flamingo Dots
Lagoon Shimmer Tape
My Crush Book
Wildwood Assortment

The raindrops were done with a stencil I cut from Cricut Creative Bug which is free in DS.  I cut the stencil and used homemade texture paste tinted with Sky re-inker.  I did gesso the page with clear gesso before using the paste.  No worries using gesso or paint on these pages because they are thick!  Paint them, sand them, gesso them, put brads through them, possibilities are endless with these durable pages!

The boots were cut from Cricut Paisley Cartridge.

Check out the My Crush Book products at KatiesCorner!  I really love my book.  It's such a fun place to document my memories, art journal, glue in a few pics, or just "goof around" with some new ideas.  I was nervous about using it....silly, I know.....but I truly enjoy it now!  Here are some other Crush Book entries:  Indulge Me, Please, It's Always a Good Day......, and My Crush Books.  My book happens to be the Wildwood Book and as you can see, many of the CTMH papers compliment it really well!  I'm sure that is true of all the My Crush Books.

Oh, by the way, I had nominated Miss Katie to do an All About Me sort of page and it's up at Katie's Corner!  Check it out!

Interestingly enough, it's raining here!  So, I better get out to the barn and feed again.  Hope it's sunny in your world!

The Season to Layer!


I love the new stamp "Christmas Post" from CTMH.  It looks so vintage and has such a Victorian air about it.  When I saw the sketch challenge over at Heart 2 Heart I knew I wanted to get that set out of the envelope!  When I saw the challenge over at 613 Avenue I was inspired to use it as a tag!  I layered this one, so it's going over to Craft Hoarders Anonymous as well!

I cut the tag free hand from Daisy White and Indian Corn Blue.  I stamped little snowflakes from the "Flakey Friends" stamp set.   I glued a scrap of lace on the blue CS and layered the CTMH Shimmer Trim over it.

That sweet snowman is from "Christmas Post" and he is stamped on a piece of scrap paper from the retired Balloon Ride paper.  After stamping with White Daisy I heat embossed it with white powder.  I distressed the edges and inked them a bit.

The sentiment is from "Very Merry Christmas" stamp set.  The Blue Epoxy Bubbles and Baker's Twine are also from CTMH.  The tulle ribbon is still left over from Katie's wedding!  Wow, will I ever run out of that?

All CTMH is from KatiesCorner.  Oh, by the way, I had nominated Miss Katie to do an All About Me sort of page and it's up at Katie's Corner!  Check it out!

Monday, October 27, 2014

Pumpkin Patch Fall Classic 2014


Our weekend was full of excitement here!  Our horsemanship program, PATCH by Design had its fall horse show!  Nine participants ranging in age from 3 1/2 to 15 showed horses in three different classes.  We had one riding class, a showmanship class and an in-hand freestyle class set to music with costumes!  We followed it up with a pitch-in banquet and awards.  It was a great day full of joy!


When I first saw the Scaredy Cat paper from CTMH, I was inspired to make the programs for the show.  (I have to say, this is one of my favorite paper collections in the new idea book!  I fell in love with this one the moment I saw it!  I know Halloween is upon us, but I think I'll order more just because I love the Thistle!)  I was unsure of the program design until I saw this pumpkin card in the new Artfully Sent cartridge.  I wanted an interesting, fun program that would easily come together since I needed several of them.  This fit the bill since the Cricut and my computer did all the work!  I did color the pumpkin, glue the leaves, staple it, and tie the ribbons.  Ribbon is from Michaels.

The text on the right is from CTMH Artiste written with the Cricut Violet pen.  Leaves were cut from the CTMH Artbooking.

There were  six pages in the program listing the classes, names of exhibitors, benefactors, program schedule, etc.


 "Think it, feel it, do it" is sort of our motto here when working with horses.  We serve children and teens with learning disorders, different life situations, ASD, DS, and other challenges.

I can't show pictures of the kids showing, but I can share a picture of the horse they named Horse of the Year!  This is Thunder.  The picture below was taken of him at the awards ceremony standing in front of the crowd.  He was certainly the star!

I was so proud of all the kiddos, horses, and my amazing team who give so much of themselves every week!  I am so blessed to watch horses change lives; it's a fascinating miracle!

The Amazing Thunder and my son Keith.  
This project fits the challenge over at Color My Heart since the colors there this week are Thistle and Sunset!  It is also going over to Fantabulous Cricut Challenge since this program cover really was made from a Halloween card cut!

If you are like me and love this paper collection, you can check it out at KatiesCorner!  Oh, by the way, I had nominated Miss Katie to do an All About Me sort of page and it's up at Katie's Corner!  Check it out!

Tuesday, October 21, 2014

Wrap It Up!


 Happy Birthday to Exploring Cricut and More!  There's such a great celebration over there and I'm so happy to have been invited to the party!  Now, don't be sad 'cause you're invited, too!  Just follow this link to join in the fun:  Exploring Cricut and More Birthday !

Since it's a birthday, I decided to share a present and wrapping I made for my sister.  Now, for those of you who follow my blog you may be thinking you saw her birthday card weeks ago!  (You'll notice a color theme here!  These are her favorite colors.)  Yes, you did; her birthday was in September.  We always celebrate all the fall birthdays together at one time in the middle of October.  Ok, I realize that was probably more info than you needed about my family's celebration habits, so on with the project!  ; )

The actual necklace was made from the Base and Bling Collection at CTMH.  The Base and Bling pieces include:  Faux Silver Chain, Faux Silver Square Pendant, Square Glass Cover, Storyteller Sheet, Rhinestone Charm, and Storyteller Charm.  I added a couple of jewelry rings from my stash.  For directions on making this necklace see this video.

I made the display card from CTMH Olive and Sweet Leaf cardstock.  I cut a piece of cereal box the same size as the Sweet Leaf piece of CS and glued it all together.  I punched a couple of small holes and cut slits on the diagonal to the holes.  To keep the chain in place I found a little bag with self sealer and stuck the remaining chain in and just stuck down the self sealing part.  I never throw anything away.....does this make me a hoarder?  Yikes, oh well.....in this case it worked out well!

Now for the moment you've been waiting .........  The Wrapping!


 This sweet little pillow box is from the Wrap it Up cartridge.  I used CTMH Ivy Lane (retired) papers.  I cut the little flower from the same CS's as above.  The little flower is cut with a hole in the middle.  I simply cut two.  I tipped them in Smokey Plum ink and curled the petals a bit.  I used a bit of scrap tulle and tied it around the box.  I knotted it 3 times to give it a large knot and pulled the knot through the hole in the flower.  I then trimmed off the excess tulle.  EASY!!

Have a great time at the party!

This is also going off to Take Heart Ideas October Challenge.

Monday, October 20, 2014

Indulge Me, Please! ; )

My paper crafting friend, Gail, at www.greetingsfromgail.blogspot.com nominated me, of all people, to answer some interesting questions and share some insight into my creative process!  Now, I must say, this has been way more fun for me than it probably will be for you to read; therefore, it's been sort of a guilty pleasure/indulgence.  Hmm.......where have I seen that lately?  Let me think on that I as I write this post.......

So, here are some questions about my creative process and how my brain works..... this could get a little scary; maybe I should have saved this for Halloween!

1.  What am I working on right now?

Ok, wow,  I'm in the middle of 4 projects!  Yikes!  I have a canvas laying on my table drying.  There are programs for a horse show/banquet in pieces.  I have another canvas in the other room with cuts laid out and finally the project I'll be showing you today!  I recently finished a birthday gift for my sister posted over at Exploring Cricut and More.

2.  How long does it take me to create a project?

Well, it depends on the project, my mood, and how much coffee I've had!  It seems some projects just come together so quickly and others get started and sit on the table for days or more!  Canvases can take me a couple of days.  I cut all of my own dies on the Cricut and finish them.  That can take some serious time.  I also like to make my own texture paste and glimmer mists.

3.  What are my favorite things to use in my creations currently?

I love using lace, however I haven't used much of it lately.  Creating with lace just feels indulgent to me!  I also love making and using flowers on layouts.  Here's a sneak peek
at some I'm using currently.

I love to use tulle and old pieces of jewelry.  Wait, I've also been using burlap in my country feeling projects.  I love all embellishments, let's just put it that way!

4.  How does my creating process work?

I suppose it depends on what I'm creating.  If I'm working on a layout with pictures, the photograph seems to drive the piece for me.  If I'm working on a card, I often am inspired and motivated by challenges.  I have also been motivated by sketch challenges for layouts.

That being said, the actual physical process goes something like this.  I sit at the computer and design my creation in Design Space.  This gives me sizes and dimensions.  I start with squares to represent my pictures and change them into the rectangle (square) sizes I want for the photos.  Then I start choosing the dies, frames, elements, etc I want on the page.  I print my pictures at this point and see what colors I want for my papers, inks, paints, etc.  I cut my dies and cut the backing for them from ......wait for it........cereal boxes!  I love cereal!  So, I have lots of boxes for my die cut backings!  This gives the dies more dimension and a chipboard feel.

I take all my goodies over to the table and go to town with inks.  I love to embellish my die cuts.  Once they are all set, I start the layout.  This is the point I start to visualize where other embellishments might go.  I usually lay out everything and I might snap some pics with my phone or camera if it's within arm's reach!

Now, I commit to the adhesive!  If I mess up something, or should I say WHEN I mess up something, I make it work!  I seldom throw away anything.  If I can't make it work, I save it for another project.

5.  How do I become inspired and stay inspired?

Easy question!  Research and challenges!  I love to watch videos!  I watch a lot of Gabrielle over at Such a Pretty Mess and Vicki at Clips n Cuts.  I also enjoy the CTMH videos, of course!  Since my daughter sells CTMH, I like to watch other videos and see how my CTMH products could be used in similar ways.  Oh, and there's always Pinterest!  I also like to hang in the barn and some of my ideas are born there.

6.  What is my signature style?


I didn't realize this is a signature of mine, but the comments I receive the most often seem to include the word "detail" in them.  So, I suppose detail is big in my work.  Pictures are worth a thousand words, so here ya go!


7.  What is your favorite piece you have created?

Wow, that's a tough one.  I have a few I really enjoyed doing.  I guess my favorite is "Sisters" followed by "Pumpkin Baby" and "Red, White, and Blue Cowboy Style."

Thanks for indulging me!  Hey, speaking of indulgences and guilty pleasures....over at Heart to Heart that is one of this month's challenges and here is the 4th project I've been working on!


This is truly an indulgence for me right now in the midst of the other projects I need to finish!  I love working in My Crush Book from CTMH!  I treat it like an art diary of my life.  I put pictures in it as well as art journaling.  Oh, and yummy coffees are also one of my favorite indulgences!

It's also going off to Aud Sentiments, 613 Avenue Create,  and Pile it On.


Hey, Katie Smith, tag!  You're next to answer these questions!  Be sure to check out KatiesCorner in the next few weeks to see what she is working on and how her brain works!

All CTMH products used are from KatiesCorner.


Wednesday, October 8, 2014

I Love Sketches!


Over at PATCH by Design, we are preparing for our Pumpkin PATCH Fall Classic Horse Show and Art/Learning Exhibit!  This is a really fun time for the kids in my therapeutic horsemanship program. It is a special event where they get to show their horsemanship skills in riding and in-hand classes.  This year I added a special class called In-Hand Freestyle.  In this class they get to choose a song and do an improv freestyle with a miniature horse.  

They are all excited choosing their music, costumes, props and elements for the class.  I decided to commemorate the class I would make canvas wall hangings of each of the nine students with their horse and song title to exhibit at the art show and then give them to the families at the banquet.  

Thank goodness for the sketch challenge at Stuck? Sketches!   This gave me an idea for this piece.  

The retired printed papers are all from CTMH.  I embellished with cuts from Cricut Old West and Country Life (the 'HAPPY' banner.  Other banners and circle were cut from CTMH Art Philosophy.   Other embellishments include:  CTMH Ruby Washi Tape, CTMH Studs, CTMH Mocha Gems, embossing powder, Darice Hemp Cord, and homemade glimmer mist.  The canvas is from Michaels.  

Well, only 7 more to go......  Off to find more sketches and ideas!

All CTMH is from Katiescorner.  The stamp of the month for October is really cute and there is a ribbon deal going on at CTMH!


Friday, October 3, 2014

Steamy Shaker Card


What inspired this card?  Well that's a long story........but the short answer is research!  That's what I tell my husband I'm doing when I hide away in my craft room and watch videos of various project tutorials!  

I was watching this video by Vicky at Clips n Cuts and loved the idea of a shaker cup card!  Then I remembered this video by Gabrielle at Such a Pretty Mess and wanted to do the tag idea.  Then I saw the sketch at Atlantic Hearts and the idea is born!  Now I have to make a small confession.  I am a bit dyslexic.  I looked at this picture several times and walked back to the table where I work and reversed the small rectangles with the long ones.  I mean to tell you within a matter of seconds my brain can reverse things.  Now, here's the fun part.  I actually went back and looked at it several times to be sure I was doing it like the sketch image!  Oh well, I am who I am!   

I started with papers from CTMH Yuletide Scrapbooking Workshop on the Go.  I love to purchase those.  Like I said before, I never make what is there, but I use everything in the package!  It's a great bargain for me.


The Ruby CS was run through the embosser and lightly sanded.  

The tag was cut from Joys of the Season.  It was stamped with miscellaneous stamps from CTMH Love Life, Universal Backgrounds, and Curlicue Frames.  I "sliced" a heart from a square shape in Cricut Explore to back the tag.  I glued the acetate behind that and adhered 3-D foam tape around the heart cut.  The shaker ingredients are cut gold sequins from the WOTG and gold glitter.  

Cartridges include:  

Artiste -- doily
Art Philosophy -- flower
Gypsy Font -- bird
Storybook -- flourish

The vine cut was laying on my desk from another project and I can't remember where it originated!

Embellishments include:
Mocha gems (of course -- my fav!!!)
Sequins
Scrap of fabric
Twine scrap

CTMH Inks include:
Ruby, Slate, Chocolate, Barn Red, New England Ivy, Topiary

Other:
Gold ink
Homemade glimmer mist on flower

My card base is Kraft CS.

I love research!  I could spend hours watching tutorials and looking at pictures!  They are so inspiring to me.........much like these sites where my card is going!

Sentimental Sudays - use Kraft cardstock
Atlantic Hearts - sketch
Heart 2 Heart - use your fav embellishment (Mocha gems!!)

All CTMH is from Katiescorner.


Thursday, October 2, 2014

Halloween Fun at Exploring Cricut!


Fall is in the air, costumes are out in the stores, pumpkins and mums are decorating entryways; it must be time for Halloween!  It's definitely time to prepare, anyway!  Over at Exploring Cricut there are lots of great projects to inspire us for the holiday!

Today I have the privilege of sharing a card cut from the recently released CTMH cartridge Artfully Sent.  This new cartridge is chalked full of great card ideas as well as clever cuts for art journaling, scrapping, decorating, teaching aids, etc.  I really am enjoying this new cartridge and excited to try some of the 3-D interactive cards.  

I started with CS from CTMH Scaredy Cat Paper Pack.  The sentiment shape and its background are from Art Philosophy.  The sentiment was written using the Cricut Explore and the Cricut Alphabet.  I colored the letters in with a CTMH Gypsy marker.  I finished it off with CTMH glitter tape, a bow, and the left over ghosts cut from Artfully sent.  (You'll see how they were left over in the picture below.)  I did darken the ghosts with a little Gypsy ink.

At this point you might be thinking, 'Ok, nice, but where's all the fun?'

It's on the INSIDE!  


Isn't this a fun cut?  I love the way the mansion and fence stand out in front of the tree and the ghosts are coming out from behind!  I shot this pic using lights to try to emphasize the shadows to show the 3-D effect.  I hope you can see it.

I added a little bit to the original cut.  When this cuts, the ghosts and moon cut out of the background.  The tree is connected to the tombstones and the mansion is connected to the fence.  So, when I cut it, I cut the tree from Slate and Whisper CS.  I cut the mansion from Black and Sunset.  Then I cut away the tombstone from the Slate gray and the fence from the Sunset orange.  The pieces were then layered and glued into place.

I stuck a piece of leftover photo paper behind the Thistle CS so the ghosts would be white.  The moon is slightly yellow because I inked part of the photo paper in the corner.

The stars were done with texture paste mixed with a drop of Honey re-inker.  I used a star stencil cut from stars in the Art Philosophy cartridge.

It is going to be great fun to explore this cartridge further.......lots of fun to be had here!  Speaking of fun, keep checking out the fun at Exploring Cricut.  I can't wait to see all the Halloween fun!